There can never be too many explanations of masks. One description may leave you confused while another hits just the right spot. The odd thing about this is that, once you “get it,” you’ll wonder why you didn’t get it right away. I wondered the same thing, but I don’t know why it works this way. Brain chemistry, perhaps.
It’s easier to learn by doing than it is by reading, and so in that spirit, I’ve placed a small download over at The Frame Locker of the files you’ll use in the following exercises. The download includes 3 grayscale masks, 3 alpha masks, and even a photo so you’ll have everything you need all in one place. Create a folder named anything you choose–“Elementary Masking,” for instance–and then unzip the downloaded package there. Here’s the link: Elementary Masking.
Preliminaries:
1. Open Producer and navigate to the newly created folder where you unzipped the downloaded files.
2. Drag the photo into the first slide.
3. Change the default black background to red, blue, green, or whatever pleases you. This is to make the masking more obvious.
Simple Grayscale Mask:
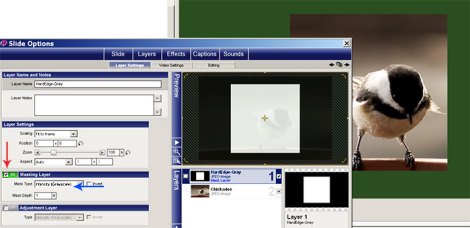
Step #1: With Slide Options > Layer Settings open, drag HardEdge-Gray.jpg into the slide, making sure it lands on top of the photo, making it Layer 1.
Step #2: With Layer 1 highlighted, put a checkmark beside “Masking Layer” in Layer Settings and make sure it’s set to “Intensity (Grayscale).” [Color of the words matches the arrows in the illustration because it couldn’t be made large enough to actually see.]
Look at your preview screen to see the result. Wherever the mask is white, the corresponding area of the photo shows, and wherever the mask is black, it’s as if that area of the photo had been erased.
Simple Alpha Mask:
Step #1: With the Options window open, drag HardEdge-Alpha.png over on top of the grayscale mask, replacing it.
Step #2: Change the mask setting from Grayscale to Alpha.
The result will be exactly the same as it was using the grayscale mask, but in this case, wherever the mask is opaque, the corresponding area of the photo shows, and wherever the mask is transparent, it’s as if that area of the photo had been erased.
Grayscale Blend:
Step #1: With the Options window open, drag SoftEdge-Gray.jpg over on top of the mask in Layer 1, replacing it.
Step #2: Change it to a grayscale mask.
The result is a vignetted photograph. Why? Because the white area in the middle of the mask slowly blends into gray, gradually getting darker and darker until it’s black. Since gray contains both white and black, it shows some of the photo and some of the background. The lighter the gray (more white), the greater amount of the photo it shows, and the darker the gray (more black), the less of the photo it shows and the more of the background it shows.
Alpha Blend:
Step #1: With the Options window open, drag SoftEdge-Alpha.png over on top of the mask, replacing it.
Step #2: Change it to an alpha mask.
The result is no different from the one you got with the grayscale mask. In this case, instead of white fading down into black, you have opacity fading out into transparency. The more transparent the area of the mask, the more of the background it shows.
♥ ♥ ♥ ♥ ♥ ♥ ♥ ♥ ♥ ♥ ♥ ♥ ♥ ♥ ♥ ♥ ♥ ♥ ♥ ♥ ♥ ♥ ♥ ♥ ♥ ♥ ♥ ♥ ♥ ♥ ♥ ♥
Though we used a simple colored background in the examples, you can use any image, gradient, solid color, or even video as a background by simply placing it beneath the masked pair. You can also place images that have transparency in them (such as frames) above the masked pair.
All of the examples are rock-bottom basic, but without understanding the basics, you can’t move on to anything more complicated. I suggest playing like mad, even breaking things, until you get a really good understanding of how those neat little masks do their work. While you do this, you may find yourself favoring one type of mask over the other. My favorite is the grayscale mask simply because I can more easily see black, gray, and white than I can opacity, translucency, and transparency, but you may find the opposite is true for you.
So there you are: yet another basic masking tutorial.

That’s it!.._Perfect.. Thank you Barbara for making this specifically for the “hunh? what?” newbies like me who most of the time haven’t got a clue as to what everyone is talking about with all that is masking…I followed carefully along in your detailed tutorial and was amazed at how uncomplicated in can be…Thanks again for “unMasking” the mystery!
Isn’t it wonderful to get one of those “Aha!” moments? Oh, the joy!
Barbara